QuickBooks Online Inventory Deep Dive
The first aspect is dealing with how to provide credit for the trade-in item in the sales receipt. The easy answer is to say just add a line for the trade-in item and show the amount as negative. Well, how to set up that item in product/service? If you set that trade-in item as an Inventory item, it will not work. It will mess up COS and a few other things. We will need to create that trade-in product as a non-inventory item and create another entry to add quantity and cost to inventory.
For this example, let us say you are in the cellphone business. You’re selling one unit of iPhone for $600 and offering a $150 trade-in credit for a used Samsung Galaxy phone. And, the customer is paying $450 plus tax by check.
Step # 1
You will need to add one new account to the Chart of Accounts.
To add a new account to the Chart of Accounts:
From the home page screen
- Select the Company Gear (located in the upper corner)
- Select “Chart of Accounts” under the Settings header
- Select the blue “New” button
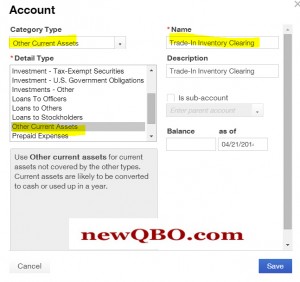
- A new “Account” screen will open
- Select Account Category = Other Current Assets
- Detail Type = Other Current Assets
- Name= Trade-In Inventory Clearing
- Description = Trade-In Inventory Clearing
- Remember to leave the account “Balance” blank
- Save
- See screenshot photo for reference
Step # 2
You will need to open a new product/service item for trade-in credit
To add a new item in Products and Services:
From the home page screen
- Select the Company Gear (located in the upper corner)
- Select Products and Services under the Lists header
- Select the blue “New” button
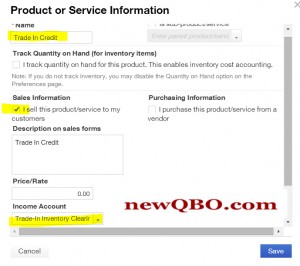
- A new “Product or Service” screen will open
- Name = Trade-In Credit
- Sales Information
- Checkbox: I sell this product/service to my customers
- Price/Rate = Leave blank
- Income Account = Trade-In Inventory Clearing
- Save
- See screenshot photo for reference.
Step # 3
To Create Sales Receipts
From the home page screen
- Select Create “+” Plus sign (upper-middle)
- Select the “Sales Receipt” screen
- Select Customer
- Select Payment Method
- Under Product/Service,
- 1st line > select a new product item selling for $600 (in this example Apple iPhone 5s)
- 2nd line > select newly created “Trade-In Credit” item (in this example Samsung Galaxy as negative $150)
- Subtotal before tax is $450.
- Tax = $48
- Total Amount Paid = $498
- See screenshot photo for reference.
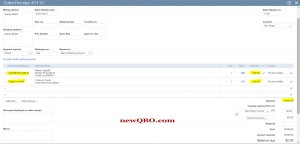
This sales receipt will handle as usual revenue and COS aspect of regular inventory items sold and also set up $150 as a non-inventory asset on the Balance Sheet.
Now next step is to move this trade-in item (with quantity on hand and value) from Trade-In Inventory Clearing to a regular Inventory Asset Account.
Step # 4 & 5 (together)
To add in Used items as inventory on hand, we will create a zero Bill.
From the home page screen
- Select Create “+” Plus sign (upper-middle)
- Select “Bill” screen
- Create a new vendor as “Trade-In” (preferred name)
- Under Account Details:
Select Account = Trade-In Inventory Clearing (this is set up as other current assets)
Amount = -$150 (negative amount) - Move to Item details:
Under Product/Service
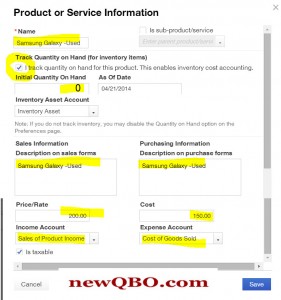
Select “Add New” - New Product or Service Information will open.
This is to setup trade-in items as Inventory (in this example Samsung Galaxy, Qty 1, cost $150)
- Name = Samsung Galaxy Used
- Track Quantity on Hand (for inventory items)
- Checkbox: I track the quantity on hand for this product. This enables inventory cost accounting.
- Initial Quantity On Hand – 0 (very important, do not enter qty 1)
- Inventory Asset Account = Inventory Asset
- Enter Sales and Purchase Information (preferably same as name)
- Price/Rate = Selling Price (for example $200)
- Cost = Actual Cost (in this example $150)
- Income Account = Sales of Product Income (selection of preferred income account)
- Expense Account = Cost of Good Sold (default account, no need to change it)
- Select the Taxable box if this item is taxable
- SAVE
- See screenshot photo for reference.
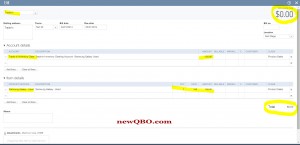
Now back to the “Bill” screen again.
- You should see
Qty = 1
Rate = 150
Amount = $150 - Balance Due, as well as Total, should show as $0.00.
- Save and Close
- Done.
- See screenshot photo for reference.
Now, if you go back to see your Inventory on hand report, you should see quantity as 1 for Samsung Galaxy Used item which is correct. Also, go back to the Trade-In Inventory Clearing account, the balance should be zero which is correct as well.
QuickBooks Online Video Tutorials